Showing posts with label Family Fun. Show all posts

Wednesday, August 24, 2011

A Tribute to Summer: The Keslers on Studio 5


Okay, friends! Our local NBC affiliate, Studio 5 has picked up on the Kesler Family... If you are in the Utah viewing area, tune your t.v. to KSL's Studio 5 on Thursday, August 25, as the Kesler's latest video will be featured on the show as a tribute to summer. Come join the fun!


Friday, August 12, 2011

It's Friday!! New Kesler Video...


Chances are, if you have a teenager, you may be familiar with the popular (or rather, unpopular) version of the song, "Friday"...

Well, the crazy Kesler family who brought you the "Jump" and "Deck the Rooftop" videos now has a new video to Glee's version of "Friday".... A fitting song to kick off the weekend!

Filmed at their recent week-long family reunion, you'll see once again the silliness and fun that permeates the entire clan (2 parents, 7 adult kids, 6 spouses, and twenty-something grandchildren). Watch for the famous belly flop, and notice the two dozing off at the very end---yes, they're truly asleep.

It's Friday!!! Eat your heart out, Rebecca Black.

Wednesday, October 6, 2010

The Crazy Halloween Dinner Tradition...Revisited


Last fall, I posted about our family's tradition of the Crazy Halloween Dinner. I had several people contact me for more details, so I thought I'd revisit this post again, but a little earlier in the season. It is such great fun! But BEWARE: After doing it once with your family, you just may be coerced into doing it again and again! Your kiddos and any guestswill love it.

Here is how it works:

As the hostess, begin by planning your menu for the evening. For us it generally consists of regular meal items such as chicken and potatoes, barbecued beef sandwiches, or some type of casserole. But as you can see in the photo above, my niece planned her menu using some unique food choices for the occasion. Either way works great...just don't feel pressure to fix anything out of the ordinary. The food itself is not necessarily the entertaining part of this meal...it is how it's presented that makes it such fun!

So, begin listing your menu items so that you have 12 things on your menu, but these will also include a drink, each of your utensils, and a perhaps a napkin. Here is an example:

1. Spaghetti and Meatballs
2. Green salad and dressing
3. Buttered peas
4. Garlic bread
5. Fresh fruit
6. Jello salad
7. Punch to drink
8. Pumpkin cheesecake for dessert
9. Napkin
10.Fork
11.Knife
12.Spoon

The next step is to get creative and assign a spooky and crazy name that provides a subtle hint as to what each menu item might be. For example, the garlic bread could be called "Tombstones"; the punch could be "Witches Brew"; and the spaghetti and meatballs...well, I'm sure you could come up with something that sounds totally disgusting!

Now create a menu that lists each of the crazy names on them, and a space in which to write the numbers 1, 2, or 3, which will designate which course that item will be served in. You will be serving 3 courses of four food items. (You could also serve 4 courses of three food items if desired.) Be sure to make a master "key" so you can easily remember what each food items are called!

The following is menu and key from a few years ago that you can use if you'd like. Just click to enlarge, and print.

When your guests arrive, give each person a menu and have them choose their food items for each course by numbering them 1, 2, or 3. The fun of this is that your guests won't know exactly what they are ordering, and little will they know that they are ordering their utensils as well! Be sure that each guest's name is on his or her menu, then collect them before you begin serving.

I line up all the menus on my counter, then dish up each person's plate according to what they ordered, then serve one at a time. After everyone is finished with their first course, I take their plates back (and any utensils they had for that course) and serve them their second course and so on. My hubby usually helps, so it goes quite quickly, and everyone is happy to chat for a bit between courses. And, the family who first introduced this tradition to us gave us this tip...that once a person's drink is served, he can keep his cup for refills throughout the rest of dinner. That is usually very appreciated!

Every year, someone inevitably orders their spoon, a knife, a side dish, and a roll for one course, and in the next they have their dessert, a main dish, a napkin, a drink, and no silverware. Yep, a little crazy, but lots of fun! It's especially entertaining when we have another family over to share the surprises with.

Last year, my niece and her husband hosted our dinner, so it was entertaining for me as well, as I didn't have a clue what I was ordering either! They were great hosts and came up with unique new dishes that our family hadn't tried before, which made it extra fun for us all!

The most popular and talked about dish of the night? The "Kitty Litter!" It consisted of vanilla pudding topped with crushed graham crackers and an occasional melted tootsie roll that looked like...well, you know what. Rather disgusting, but delightful for the youngsters at the same time!

Here is Blondie determining which menu items she wanted for each course:


A.W. had to eat his "Ogre Buttocks" (ham) and "Sliced Snail" (pumpkin roll) with a knife:


And by the time Blondie got to this course, she had no silverware!


It was a great night, and filled with some entertaining memories! The Crazy Halloween Dinner is a now a standard tradition in our home. If you give it a try, I would love to hear about your menus and how you made it special for your family.


Tuesday, January 26, 2010

The "Sweetheart Dinner" - Part 1


My sister Candice is the queen of traditions. Thanks to her, her grown children have some of the best memories, I'm sure! One of my favorite traditions of hers is the "Sweetheart Dinner" that she organizes every year near Valentine's Day. It's a time for the sweethearts in her life to visit and enjoy an evening of delicious food and being together. Special place settings are arranged, fine china is utilized, festive food is prepared, and proper etiquette is taught to the youngsters. What a fun tradition!

We have had our own "Sweetheart Dinner" at our house and the kids are always so excited when they get to actually use the fancy china and drink from the usually-forbidden goblets. And eating by candle-light makes it all the more special. Ambiance is everything, right?

Today, and in the next few days, I'll be sharing some sweet and simple ideas to help you prepare for a festive "Sweetheart Dinner" of your own.


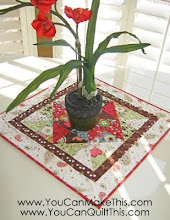
First up is today is a simple pattern for creating a "Sweetheart" Table Runner to adorn your Valentine's Day Table (or any-time-of-the-year table) available at You Can Make This. And the good news? The pattern is free! Take advantage of this great offer, and get your table primed and ready for the sweethearts in your life!

(As an end note, the lovebirds image stitched onto the runner in the top photo is available for machine embroidery here at SWAK Embroidery. A hand-embroidery e-pattern is on it's way!)


Enjoy!

Monday, December 14, 2009

Christmas Advent Candle Activity


Each year at Christmas, I determine that I want to have a more Christ-centered Christmas. As we have all experienced, it is so easy to become consumed with shopping, decorating, crafting, gift-giving and receiving, dreams of Santa and all he might bring....all good things! But sometimes it is easy to get carried away, and we easily forget the true reason that we celebrate Christmas in the first place.

My sweet friend Dana, gave our family an early Christmas present that I'm so excited about! It is just a little something that will help us stay more focused each day on Jesus Christ, and truly ponder upon his life and all the reasons we have to celebrate His birth. We her permission, I share it with each of you. Not only is this a great activity for our families, but it is also an inexpensive, yet meaningful gift for neighbors and friends. Please share it as much as you'd like.

Simply click on the image below to enlarge it, and print it to follow each day for the next twelve days, finishing up on Christmas Day.


At each nightly reading, light a candle as a reminder of the Light that Christ brought into the World. In the image above, I took the tapered candle she gave us, and simply placed it in a dollar store goblet filled with Epsom Salt and tied with a ribbon. We'll place this at the center of our table each night as we read. I think I'm going to serve hot cocoa as well...just to make the activity that much more enticing and special.

I hope as Christmas approaches and throughout the upcoming year, we can each find room in our hearts to let the Savior in to our lives. In the words of Thomas S. Monson, "If we are to have the very best Christmas ever, we must listen for the sound of sandaled feet. We must reach out for the Carpenter's hand. With every step we take in His footsteps, we abandon a doubt and gain a truth."

With love and wishes for a special Christmas,

Monday, September 28, 2009

Make a Recycled Notebook...(from My Pantry to Yours!)


I recently saw this amazingly simple, yet fun and funky way to make recycled notebooks, and my girls and their friends have had so much fun putting them together. I think we may have cut up half my pantry in the process! They are easy to do, and a fun project for mom and kids to work on together.

To start, you need:


*empty boxes--cereal, Jello, pasta, taco shells, fruit snacks, etc. Any size will work.

*scissors

*paper cutter (not completely necessary, but handy nonetheless)

*hole punch

*ribbon, jute, string, yarn, etc.

*ruler

*plain, lined, or recycled paper - good old copy paper works great.

1. Start by cutting up your boxes at the edges and corners to leave a flat front and back to work with. These will become the front and back of your notebook. Little hands are good for this!


2. Next, use the paper cutter to straighten the edges, and to help make the front and back uniform in size to each other.


3. Measure the front and back panels, then with the paper cutter, cut several sheets of paper just slightly smaller than the panel measurements. Save the larger scraps of paper, as they are perfect for using in a "jello" box sized book!

4. After getting your paper all cut to size, use the ruler as a straight edge for the notebook front panel. Place the ruler parallel to the left side edge about 3/4" in, and create a crease on the front panel. Fold the edge completely over, and crease again as it is folded down. This will help your notebook to open easily.

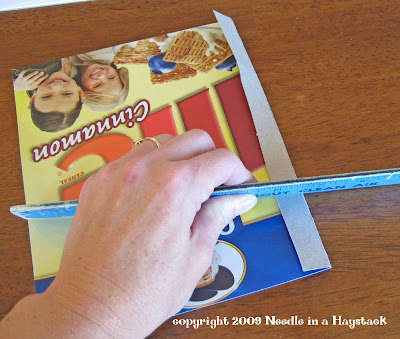
5. Now, just eyeball it and punch a few holes between the crease and the edge. (I started measuring meticulously, but it soon became too painstaking, so I gave it up and just guesstimated.) Start at what looks like the center, then make holes near each end, then a few more in between. It doesn't have to be perfect! Use these holes as guides to punch through the back panel and the paper sheets in between.


6. Now you just need to thread the ribbon, string, yarn, or whatever you want to use through the holes to bind your book together. You can be creative with this part, and just do it however it strikes your fancy! (The taco shell box book turned out to be my favorite!)


That's it! My kids love to draw and doodle--especially in church or while riding in the car, and we never seem to have enough paper on hand, or a hard surface to write on. These can be made small enough to fit inside church bags, scripture cases, school packs, or large enough to hold some serious artistic doodling for riding in the car! I'd love to see what you all come up with!


Monday, May 18, 2009

Family Fun Night - "Four Corners"

Today I have another Family Fun Night game to share that is super easy to play, and requires no supplies, other than a large room with four corners. This was a staple in my classroom years ago when I used to teach school, and now it is a regular at our house as well. Many of you may recognize it yourselves. It's simply called "Four Corners". The object is to be the last remaining family member that does not get called out. Let me explain...

First, designate each corner of the room with a number. It's easiest to start in a main corner, and number them clockwise. Be sure every family member can remember which corner is which.


Next, choose one person to be "It". He or she sits somewhere near the center of the room with eyes closed (we make our family members put their heads down on the couch or the nearby stairs--no peeking!) That person counts to 10 while the other family members quietly sneak to any corner to stand in. Whatever corner you are standing in when "It" gets to number "10" is where you have to remain standing! When the person who is "It" finishes counting (and with eyes still closed!), he or she calls out one corner number: 1,2,3, or 4. If you are standing in that particular corner, you are out.

Counting by "It" then resumes and the rounds continue until there is one last person remaining. The last person in, wins! At that point, that person becomes the new "It", and the game starts over with everyone playing again.

Like I said, super simple to play, but lots of fun!

Monday, May 4, 2009

Family Fun Night


Aahh, Family Fun Night...that special night of the week where families fight mercilessly, or where (hopefully) some fun is had and sibling bonds are created. We're about 50/50 on that scale!

For today, I thought I'd share a fun game that our family has loved over the years. Remember the PBS show, "Zoom?" (I loved that show as a kid) I'm pretty sure that's where we first learned this game. Our family simply calls it "The Sock Game".

To play, each person needs to be wearing a pair of pants with two back pockets, and have a pair of long socks in his or her possession. We found that Dad's suit socks (much to his dismay) work the best. Each player puts one sock in each of his back pockets, so one end is hanging out.

The goal of the game is to steal everyone else's socks out of their pockets while trying to protect your own (but you can't hold on to your own), all the while moving only on your hands and knees. (You can see in the photo that Little Missy happens to be cheating by standing up. We did cut her some slack since she was only 4 at the time!) When both of your socks have been stolen, you are out, and the last remaining player with at least one sock wins! Move the furniture and get ready for a little craziness, because it gets a little heated and lively, but it's great fun!

We're always on the hunt for a new game or activity. Do you have any family favorites? Leave me a message, or send me an email if it takes a bit to describe it, and we'll give it a try! Happy Family Night!

Related Posts with Thumbnails
 
Designed By Aqua Poppy Designs for Needle in a Haystack Designs.
© Copyright. All Rights Reserved.