Monday, September 28, 2009
Make a Recycled Notebook...(from My Pantry to Yours!)
I recently saw this amazingly simple, yet fun and funky way to make recycled notebooks, and my girls and their friends have had so much fun putting them together. I think we may have cut up half my pantry in the process! They are easy to do, and a fun project for mom and kids to work on together.
To start, you need:
*empty boxes--cereal, Jello, pasta, taco shells, fruit snacks, etc. Any size will work.
*scissors
*paper cutter (not completely necessary, but handy nonetheless)
*hole punch
*ribbon, jute, string, yarn, etc.
*ruler
*plain, lined, or recycled paper - good old copy paper works great.
1. Start by cutting up your boxes at the edges and corners to leave a flat front and back to work with. These will become the front and back of your notebook. Little hands are good for this!
2. Next, use the paper cutter to straighten the edges, and to help make the front and back uniform in size to each other.
3. Measure the front and back panels, then with the paper cutter, cut several sheets of paper just slightly smaller than the panel measurements. Save the larger scraps of paper, as they are perfect for using in a "jello" box sized book!
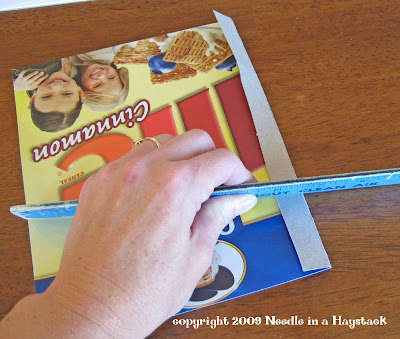
4. After getting your paper all cut to size, use the ruler as a straight edge for the notebook front panel. Place the ruler parallel to the left side edge about 3/4" in, and create a crease on the front panel. Fold the edge completely over, and crease again as it is folded down. This will help your notebook to open easily.
5. Now, just eyeball it and punch a few holes between the crease and the edge. (I started measuring meticulously, but it soon became too painstaking, so I gave it up and just guesstimated.) Start at what looks like the center, then make holes near each end, then a few more in between. It doesn't have to be perfect! Use these holes as guides to punch through the back panel and the paper sheets in between.
6. Now you just need to thread the ribbon, string, yarn, or whatever you want to use through the holes to bind your book together. You can be creative with this part, and just do it however it strikes your fancy! (The taco shell box book turned out to be my favorite!)
That's it! My kids love to draw and doodle--especially in church or while riding in the car, and we never seem to have enough paper on hand, or a hard surface to write on. These can be made small enough to fit inside church bags, scripture cases, school packs, or large enough to hold some serious artistic doodling for riding in the car! I'd love to see what you all come up with!
Saturday, September 19, 2009
The Final Installment of the "Welcome Home" Table Runner is Now Available!
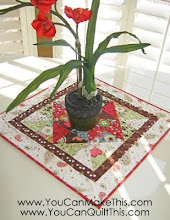
The fourth and final block for the free block-of-the-month table runner is ready for download! If you haven't started yet, it's not too late, as all of the blocks are available for free download here at You Can Quilt This.
Not only is there a hand-stitching version available, but the block designs are also available for machine embroidery here at SWAK Embroidery, and they are free as well!
For some reason, the fall often brings out the "quilting bug" in us as my niece mentioned to me earlier. Even though this sample is shown in summer colors, I can imagine a beautiful version in warm browns, oranges, golds, and greens for autumn.
If you can sew a straight line, understand stitching even a tiny bit, and can read instructions, you can totally do this project. If you get stuck, "Quilting 101" at You Can Quilt This will guide you through, and it has all of the embroidery instructions, as well as instructions for quilting and binding this project. You simply can't go wrong, so give it a whirl! I'd love to see your version!!
Labels:
embroidery,
FREE,
home decor,
quilting,
sewing projects,
stitching
Thursday, September 17, 2009
Table Runner Storage
First of all, I have to shout out a big THANKS to all you wonderful gals who have volunteered for testing opportunities! The response from all of you in my blog and through email has been more than I ever imagined! I'm so excited to get started! So, to you testers, be on the lookout in your inboxes within the next few weeks for more info. (And those of you not sure about all this can join in the reindeer games anytime! Just send me an email, and we'll get you signed up!)
Secondly, a big WELCOME to my new followers! It's so fun to log on and see a new face and name along the sidebar! I hope you'll have a great time hanging out with me here in Blogland--It has already been great fun getting to know so many of you through your comments and emails. Thank you so much! I really appreciate you followers, as you are a *stamp of approval* to others who visit this site, letting them know it might be worth their time. Again, thank you and welcome!
Thirdly, you know when you hear of an idea that is so simple and makes such sense, and you wonder why you didn't think of it yourself? That's exactly how I felt about this idea my neighbor shared with me. It is so easy and brilliant at the same time!
I had shown her one of my table runners I'd been working on, and I mentioned that I wasn't sure how to store it so that it didn't become a rumpled mess. My mother had always stored her table linens in a large drawer of her china hutch, but I have no such drawer. My runners have been folded up tight, and stuffed in a small drawer, and each time I want to use one, I have to press it and work out the fold creases. Not a big deal, but not how I really want to treat my linens and runners that I've worked on for a long time.
She then told me the secret, and I pass it on to you: Simply hang the runners or linens over a plastic hanger so as to not develop a crease in the center, and hang them up in a closet! Could it be any simpler? And, if you hang them wrong side up, the dust won't collect on the decorative side.
So there you have it....simple brilliance for storing your table linens and runners. Wish I'd thought of it myself....
Speaking of table runners, have you all downloaded your free "Welcome Home" Table Runner Blocks of the Month from You Can Quilt This? If you haven't yet, go here and get all the instructions for Months 1, 2, and 3. The fourth and final set of instructions is slated to be available within the next week or two. I'd love to see photos if any of you are working on it!
Have a great day!
Labels:
embroidery,
FREE,
home decor,
quilting,
sewing projects,
stitching
Wednesday, September 9, 2009
Wanted: Project Testers!
I am so grateful and appreciative for the marvelous response that so many of you have had toward the prospects of being testers! Thank you! Because of this great response, I am no longer able to accept additional testers at this time, but would love for you to please leave me a message if you are still interested. I'll contact you if I have some available spots come open, or if I have any special projects that require additional help. Thank you once again! ~Shelli
Remember the game of telephone that we used to play as kids? We'd sit in a circle or a long line, and whisper a message from one person to the next until the last person revealed what he or she heard the message to be?
Most of the time, we got a great laugh, as the end message was very different from the original! My teachers in school used this as a vivid object lesson of how vital clear communication is in life, and how easily information can become confused if we're not careful.
A quote on my Mary Engelbreit Calendar this year by George Bernard Shaw makes me laugh: "The single biggest problem with communication is the illusion that it has taken place." My thoughts immediately shot to my handsome hubby and myself. Can anyone relate? (Uh,love you, honey!)
Anyway, my point in all this, is that as a pattern designer, and writer of instructions, I want my "original messages " or pattern instructions to my customers and fellow crafters to always be understood and as accurate as I perceive them to be in my own brain. My goal is to make certain my instructions are clear and easy for everyone to follow.
So, I'd love your help! Each month I provide "You Can Make This" with a project that they offer to the public for free through their newsletters. In addition to that, I'm constantly working on my own patterns and designs for hand and machine embroidery. If you would be interested in being involved with "Needle in a Haystack" and being a *tester* for these types of projects, please read on:
Here's how the testing process works:
1. First of all, let me know in a comment or through my email address what you might be interested in testing, and please make sure I have a way to contact you:
*hand-embroidery patterns (no sewing involved)
*sewing projects (no embroidery involved)
*a combination of embroidery and sewing projects
*quilting projects
*machine embroidery designs
*any other combination of the above
I'll keep your name and email on file and contact you when projects become available. Do not feel like you are required to test everything that comes along just because you signed up! I'm a busy mom, too, and I know that some times of the year are simply more crazy than others, and sometimes I can't take on one more thing. Signing up simply let's me contact you when I have something, and you are always free to choose to test, or wait for another opportunity. And of course, if you ever want to opt-out and not have me contact you anymore, that is certainly fine as well!
2. Whenever some of my patterns or projects are ready, I'll contact you via email to see if the timing is good for you, and if it is a project you'd like to work on. If the time is just not right for you, or it's simply not a project you want to invest in, as I said above, there is never an obligation! I'll contact you with other projects at other times and if it works for you later on, that will be great!
If you are interested at the given time, I'll follow up by sending you the instructions. My request here is that you please commit to the project at this point if at all possible (of course, I understand emergencies, and when things go awry!) and return the feedback to me within 2-3 weeks of receiving the instructions.
3. You create the given project as outlined in the pattern, take a photo of the completed project to send me (the photo will be uploaded to "You Can Make This"--I can do this, or you can yourself as well. It will serve as a motivation and inspiration for others to give the project a try, as well as a testimonial of its worth) and provide me with feedback: clarification of measurements, any parts that were unclear to you, grammar or spelling errors that I somehow overlooked, etc. Of course, I'd also love to hear the positive stuff as well, if you have any thoughts to offer!
That's it! But, I'm sure you might also be asking yourself..."What's in it all for ME?" I'll tell you:
*You will be one of the first to have one of these patterns in your hands before they are released to the public.
*Your project photo will be posted to the product pages of You Can Make This, You Can Quilt This, or SWAK Embroidery, so you can show off your talents, creativity, and expertise to the internet world! Again, your work will serve as inspiration and a springboard for other sewers/embroiderers/crafters or possibly beginners who might become excited to try something new.
*From these patterns, you can make the projects as much as you'd like for gifts and at times for sale, depending on the various copyright guidelines for each pattern.
*After I receive everyone's feedback for a given pattern and make any necessary changes, I will send you the finalized copy for your files that will be released to the public.
*No matter if the pattern is a project for YCMT or a pattern for sale from "Needle in a Haystack", it is yours to keep for free.
*And of course, you will have a newly finished item of home decor to display, or a gift to give a friend that you didn't previously have!
Being a tester is a great opportunity to dust off those stitching/quilting/sewing skills and try some things that maybe you haven't done for a while. If you're like me, sometimes an outside motivation gets me going, and gets me out of my comfort zone a bit! PLEASE let me know if you are interested by leaving me a comment. I'd love for you to be involved!
Labels:
embroidery,
FREE,
gifts,
home decor,
quilting,
sewing projects,
stitching
Tuesday, September 1, 2009
After-School Snack: "Sugar-Crusted Chocolate Chip Zucchini Bread"
The kids are back in school, and if yours are anything like mine, they come home from school starving! We have harvested several jumbo zucchinis from our little garden boxes and one of our favorite snacks is zucchini bread.
I've tried lots of bread recipes over the years, and I always come back to this tried and true favorite, and have tweaked it a bit to my family's liking. If you don't have a zucchini plant nearby, I urge you to run to your nearest farmers market or to the grocery store, and grab a few! The zucchini in this recipe is virtually undetectable (we gotta get those veggies in to the kiddos somehow, right?), and it leaves your loaf of bread incredibly moist. I promise...the loaf won't last long!
"Sugar-Crusted Chocolate Chip Zucchini Bread"
3 eggs
2 c. sugar
1 c. oil
1 T. vanilla
2 c. raw zucchini, peeled and grated (after peeling, slice in half length-wise and scoop out the seeds before grating)
3 c. flour
1/2 tsp. baking powder
2 tsp. baking soda
1 T. cinnamon
1 tsp. salt
6 oz. (1/2 bag) MINI Chocolate Chips (The regular sized chips will work, but they are heavier and often sink to the bottom of the loaf pan. The mini's work much better in this recipe.)
Directions:
1. Blend the eggs, sugar, oil, and vanilla.
2. Stir in the zucchini.
3. Add flour, baking powder, soda, cinnamon, and salt. Stir in chocolate chips.
4. Spray bottom and sides of two large loaf pans with non-stick cooking spray.
5. Mix an additional 1/2 c. sugar and 2 tsp. cinnamon in separate bowl. Sprinkle mixture along the bottom and sides of pans. Pour batter into pans. Sprinkle a small amount of additional cinnamon-sugar mixture on top. This will give you a slightly crunchy, sugary crust on your bread. (It's yummy!)
6. Bake at 350 degrees for 45 minutes to 1 hour, depending on the size of your pans and your oven. Remove from oven when an inserted toothpick comes out clean.
7. Loosen edges of pan with a knife, and turn onto a cooling rack.
8. Slice and serve. (My kids love it spread with butter!)
Not only will your kids love this treat, but your house will smell delicious and inviting for them to come home to.
Now, another little tip is this: To have zucchini bread year-round, simply freeze grated zucchini in 2 cup proportions, and defrost when ready to use it.
Enjoy!
Subscribe to:
Posts (Atom)