
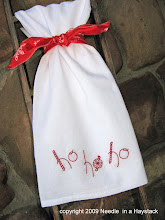
Can you believe Christmas is just around the corner? Before we know it, the snow will be flying, and Santa will be stopping by for a visit. And what better time to start thinking about all those gifts to give than now?
I've got a festive stitching design to get you started right away! Now, we're all on a little bit tighter budget this year, right? This hand-embroidered dishtowel is an economical gift that will be perfect for school teachers, dance and piano teachers, neighbors, co-workers, or friends. And... they will be so amazed and impressed that you made it yourself.

Now I've heard some of you say that you simply don't understand how to embroider, or you just don't have time or patience for it....Well, I'm here to dispel those myths! I'm going to walk you through everything right here that you need to know to complete this stitching project. There is only one stitch to learn, and it's so simple, even your kids will be able to join in on the fun. (And with a month left of summer, keeping them busy will be a bonus!) I promise. You can totally do this.
The trick with hand stitching is that you take it with you everywhere. I keep my current project in a little bag, and keep it near my purse so I remember to take it with me. I'm always amazed at how much I can stitch in the 5 minutes I'm waiting in the car when I pick up my kids from school. How many hours do we spend in the doctor's or dentist's offices? Or at dance or piano lessons, or sporting practices and events? And I don't know about anyone else out there, but I have a hard time just sitting down to watch T.V. or a movie. Stitching is a wonderful activity to help you feel productive while relaxing on the couch.
To get started, you'll need the following supplies:
 * A washed and pressed white "flour-sack" dishtowel. Several online stores sell them such as this one, or Wal-Mart and Target carry them for about a dollar a piece.
 *DMC floss in RED--any Christmassy shade you like. Michael's, JoAnn's, Hobby Lobby, Robert's, or any quilting shop will carry it.
*Embroidery hoop. A small, 4" to 6" hoop will work nicely. Again, found at the stores listed above.
 *Needle. You can purchase a variety pack of several lengths and widths to find one you are comfortable with. Also available at the stores listed previously.
 *A fine-tipped (about .05) permanent brown marking pen such as a "Zig" found at most craft stores. (Brown is simply my preference. Black will work as well, but is a little more difficult to cover up with your stitches.)
Now, Get Ready to Stitch:

1. Click on the image and print the pattern. Feel free to enlarge or reduce it to the size you'd like. The original measures about 2" tall x 5" wide.
2. Tape the pattern to a sunny window or a tracing box. Tape the dishtowel over the top of the pattern, centering the bottom mid-point of the towel over the verse. (You can also trace the pattern in one of the corners. Either will work just great.) With the pen, carefully trace the words onto the dishtowel.
3. Place the dishtowel into the embroidery hoop and pull it taut at the edges. Tighten the hoop to keep the fabric in place.
4. Embroidery floss has 6 strands of thread. Cut about a yard's length, and separate the strands so that you have two lengths of 3 strands each. Set one length aside. Thread the other length through the needle, and tie a knot in the end. You are now ready to stitch!
The embroidery stitch you'll be using for this entire project is called the Back Stitch. Let me show you how it works:
How to Back Stitch -- This is a basic and frequently used embroidery stitch. The Back Stitch works from right to left if you are right handed. (Simply reverse the direction if you happen to be left-handed.) Make sure your floss is knotted, and holding your needle in your right hand, bring it up from underneath your fabric at point A and pull taut. Put your needle back down at point B and without pulling your needle all the way through your fabric, come back up at point C.

Now pull the needle and floss taut. Repeat this action until you have stitched across the length of your line. There are two tips that will make your Back Stitch look lovely: Be consistent in the length of your stitches--between 1/16” and 1/8” is about right, and after you come up at point C and prepare to repeat, be sure to insert your needle right back down into the same hole as the floss is where you last came up. This creates a continuous and fluid line of stitches.

See? You can so do this.
Stitch the Design:
5. Be sure the floss is knotted, and begin at the first "h". Stitch all lines with the Back Stitch, and when the "h" is complete, tie a knot underneath the fabric and clip the floss.
6. Tie another knot in the threaded floss, and continue on to stitch the "o" with the Back Stitch. Tie a knot underneath once again, and repeat until everything has been stitched. This is what it will look like underneath when you have finished stitching.

Remove the dishtowel from the hoop and press with a hot iron.
Now that you've completed stitching your dishtowel, you can get creative with your presentation as you give it away. Try some of the following:

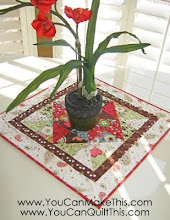
Line a basket with the dishtowel and fill with bread or goodies. The "Autumn Glory" pattern in the photo above is available here.

Use it to wrap around a bottle of sparkling cider or a jar of canned preserves. This "Believe" pattern is also FREE and available here:

Or, simply roll it up and tie with a ribbon.
For additional detailed information on other embroidery stitches, as well as tea-dying fabric, framing, and an additional free pattern, download this free eBook entitled "Stitching Essentials."

You may find other stitchery e-patterns from Needle in a Haystack to order and download here, and you may also find patterns to order by mail here.
Enjoy your free pattern as well as your new skills, and "Merry Christmas in July" from Needle in a Haystack!


aah, Shelli, you make it sound and look so easy. I might even give it a try. Thanks for sharing
ReplyDeletesue
Kate wants to do this SO badly- I wish you were still next door to give us an in-person tutorial but I will try my best to follow your directions. Thanks for the explanation and encouragement- we'll let you know how it goes.
ReplyDeleteShelli! You are so awesome! THANK YOU!!! What a DARLING pattern. I am definitely going to try it out!
ReplyDeleteThank you so much Shelli! I LOVE the pattern, and no, I can not believe Christmas is coming up already! :)
ReplyDeleteWhat a lovely blog you have. I am so excited to find you. I can' wait to try my had and making a few things. Thanks for all the great info!
ReplyDeleteSo cute! Thank you for sharing this!!
ReplyDeleteI came over from Tip Junkie and I must say - thank you so much! My mother and sisters stitch away here of there like it's nothing and I know the basics (in theory) of doing it too, but this wonderful tutorial just may actually give me the confidence to try it. Thanks!
ReplyDeleteGreat info! Thanks!
ReplyDelete