Showing posts with label How to.... Show all posts

Tuesday, June 12, 2012

Hats Off to our Graduates! A Simple and Inexpensive Graduation Gift Idea


Where does the time go? I have missed you all and missed blogging, but have been busy running to ball games, finishing the school year, and keeping up with family. I hope your summer is off to a great start!

This may be a little late for this year, but I had to share a darling and inexpensive graduation gift idea that I stumbled upon HERE.  Just add it to your archives for next year's gift giving!

 The supplies are simple:

 1. A pack of Jones soda in a coordinating school color(or any brand for that matter...Jones happens to have a nice black lid for creating a graduation hat, but I also used other brands without black lids, and they still looked just dandy. I will admit, the Jones packs were a bit tricky for me to round up, and there were limited flavors and colors.)

2. Black paper cut into 2" squares.

3. Embroidery floss in the graduate's school colors--double an 8" strand and tie into a knot.

4. Hot glue.

5. A coordinating "Congratulations" printout and/or the graduation announcement.

 You can see how easy this goes together right? Simply glue the floss tassel to the middle of the squares, and then glue the squares onto the lid tops.


 If desired, create a little "Congratulations" sign and cut it in the same dimensions as the soda box, then adhere. We got a little "punny" with our saying as you can see here:


I also trimmed and glued the graduation announcement onto the opposite side to personalize it further.  These came together in a matter of minutes, and my little gals thought they were so clever and great fun to create. And they are adorable for the graduates that you want to recognize and honor without breaking your bank.


Hats off to all you graduates and our leaders of tomorrow!
 

Friday, November 4, 2011

Welcome Studio 5 Viewers!


I'm excited today to be chatting with Brooke and Darren over at Studio 5 once again! We'll be talking about Christmas Gift Exchange Traditions and Themes.... should be fun, and more info will follow!

For those of you who may be new to my blog, welcome! Here are the links to a few of the stitchery patterns and freebies you may see on today's show:

Wise Men shown at the top will be available at Pine Needles and My Girlfriend's Quilt Shoppe within the next week (if you are local), as well as HERE online and HERE for machine embroidery.

The Rejoice design will also be available at Pine Needles and My Girlfriend's Quilt Shoppe. You can find the hand embroidery pattern online HERE, and the machine embroidery download HERE.


Joyeux Noel Dishtowels: Pine Needles, My Girlfriend's Quilt Shoppe, You Can Make This, SWAK Embroidery.
Where We Love is Home is a free download found here at You Can Make This!


The Grace pattern is here at Pine Needles.


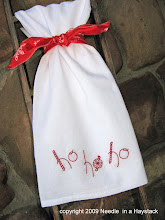
And HO HO HO is a free pattern found right here on my blog:


Thanks so much for joining me here at Needle in a Haystack! Watch for new patterns and project ideas to come in the next weeks and months!

Tuesday, July 5, 2011

Corn on the Cob Cupcakes


I hope everyone had a fantastic 4th! Summer is flying by and I just had to share with you this cutest treat that my darling neighbor Judy brought to me...Don't let these "ears" deceive your eyes! I know...I did a double take too! My kids all had to look twice too, and they thought these were the coolest.

Corn on the Cob Cupcakes...how clever! So I had Judy give me her secrets to this deceptive goodie (and they are VERY simple). All you need is the following for each ear of corn:

* 3 baked yellow or white cupcakes in white cupcake papers
* 1 corn on the cob tray
* 2 corn holders
* white frosting
* yellow Jelly Belly jellybeans for the kernels (I think she used Buttered Popcorn flavor and Lemon)
* one yellow Starburst candy for the pat of butter
* black sugar for the pepper(apparently found on the cake decorating aisle of the craft stores---unfortunately I'm not too familiar with that aisle)

Assemble the cupcakes in the tray, frost, add the Jelly Bellies in rows, and add the pat of butter and black sugar. Insert the holders to each end and there you have a fun, unique, and "corny" summer treat.

Enjoy!

Friday, February 11, 2011

The "No-Sew" Candybox Pillow--(Staples, Hot Glue, Anyone?)


I had the exciting privilege of participating once again over at Studio 5 the other morning! I demonstrated how to make the Candybox Pillow available exclusively through You Can Make This. For some added creative inspiration, click here to see how others have finished this fun and easy project!

In addition, one of the producers of the show challenged me to come up with a "No-Sew" version of this pillow to share with the viewers who might not sew, but would be interested in creating a similar look.

With the same templates and techniques found in the free download from You Can Make This, some thinking and some easy-to-get supplies, I came up with another version that was surprisingly fun to put together. (Ladies, your hubbies could even make this version for you for Valentine's Day!)

Visit Studio 5 to find out what supplies are needed (chances are you have them lying around your house) and how to create a "No-Sew Candybox Pillow"... It just might surprise you how easy it is!

Have a great weekend!

Tuesday, January 18, 2011

Tricks for Tea-Dying: Easy Tutorial!


For some of my stitching projects and home decor designs, I like to create that distressed, antiqued, and aged look on the fabric I use. One of the easiest ways to do that is to tea-dye the fabric. Here is an easy tutorial to help you achieve that same antiqued look:


1. For a mottled and lightly-dyed effect as shown in the design above, simply steep one or two tea bags in a very small pot of boiling water for 5-10 minutes. Remove the bags, then crumple a fat quarter or more of muslin and place it in the pot.


Leave the fabric there for a half hour or so, (leave it longer for a darker color) without moving it around at all. The smallness of the pot seems to keep the tea from distributing through the fabric evenly, so as to get a mottled and splotchy effect. Wring out and let dry naturally, then press to remove wrinkles.


2. Now for my favorite way to tea-dye! To create a darker, stained, tea-dyed effect as shown on this Merry Halloween design, run hot water over a tea bag for a few seconds. Dab the tea bag over muslin that has been placed on a cookie sheet. Repeat as needed.


Dry fabric for approximately 10 minutes in a 200 degree oven, watching closely. Repeat process for darker muslin. You can also squeeze the water-soaked tea bag over the fabric to create a splotchy, stained look. I would recommend dying it this way before you stitch, but it can be done after as well.

Be sure to drop me a line if you have any questions!

Saturday, November 6, 2010

Blanket Stitch Tutorial


The Blanket Stitch is an embroidery stitch that provides a nice edging for blankets, table runners, bibs, burpies, table cloths, appliqued items, and anything else that needs a finished border. It can be embroidered with large stitches, or petite ones, depending on the area that you are edging, making it very versatile for a number of projects.

To Blanket Stitch around the edges of an appliqued section of fabric, simply do the following:

1. Bring the threaded needle up from underneath the fabric (be sure the floss is knotted) to the immediate left of the appliquéd fabric at point A. Pull taut, and hold floss down with your left thumb.


2. With the needle, go back down at point B, and come up again at point C, making sure the needle passes over the top of the floss you are holding with your thumb. Pull taut once again. Repeat.


To Blanket Stitch around the edges of a runner or table cloth, follow the same basic instructions above, but when coming up for the first time, simply bring your needle up at the edge of the fabric (point A). Go back down at point B, then come up from under the fabric at the edge but without catching the fabric in the needle (point C). Again, make sure your needle passes over the top of the extended floss and pull taut. Repeat.


I have a table runner that I stitched and sewed 9 years ago, designed by an incredible embroidery designer, Sandra Workman of Pine Mountain Designs. She is also the owner of Pine Needles of Gardner Village in Utah. She is extremely creative and has a myriad of darling designs that I see everywhere. Anyway...the instructions call for a blanket stitch around the edges of the runner to finish it off (at least as I remember it way back then). Well, for 9 years, I've just displayed this runner without the blanket stitch edging because I've simply not taken the time to finish it, but it has nagged at me all these years.


As I pulled out the runner just the other day to display in my entry way, I decided that this was the year to finish it off. I was tired of being reminded yearly of tasks left unfinished!

My two gals were scheduled for back-to-back haircuts yesterday, and since I can't sit still and be empty-handed for that long anyway, I figured I would make use of the hour I would be waiting there. I grabbed the runner, some floss, a needle, scissors, and away we went!

I finished most of the edging as we all chatted through the haircuts, and I finished the rest of it during my daughter's dance class. What a great feeling to accomplish something in those minutes that could have been wasted by just sitting.


Finally! A finished project just for myself--nothing to sell or give away, and after 9 years, it's finished at last! (Eleventh hour, anyone?)


Thursday, October 28, 2010

Mod Podge and a Little Glitter to the Rescue: Ruby Slippers in a Flash...and Cheap!


For those of you who know me well, you may recognize the trait in me that quite often, some of my best work is done in the 11th hour...It's not that I try to procrastinate. Rather, I stew or ponder on things, am busy with a plethora of additional priorities, but finally, when the hour of accountability is here, quick decisions must be made, and I am thrown into action.

My Halloween costumes are no exception! My littlest one wants to be Dorothy from the Wizard of Oz this year. Like many people I know, my budget for costumes that might be worn twice EVER is pretty slim. Okay, really slim. I looked for used ruby slippers on Ebay, but even then after shipping, the costs were near $15 to $20. Not sure of how to spend as little as possible and still meet her desires, I put it on the back burner of my brain and let the notion stew...

As I was cleaning out my daughter's closet the other day, I came across this pair of old Sunday shoes with the toes worn out. I was about to toss them into the garbage when the light went off in my head! These were just the Ugly Duckling version of Ruby Slippers!!!


A trip to the store for red glitter and a little digging in my craft closet for Mod Podge and a foam brush, and I was set. Now mind you, glitter is not for the faint of heart...It was easy as pie, although my house is glittering from end to end with sprinkles of red glitter. Ah, well....it vacuums, right?

Just in case you happen to be needing a last-minute costume like me, I've got your back! The first step of "Ruby Slipper Transformation" is to stuff the shoes with newspaper and paint the shoes with a layer of Mod Podge. Sprinkle the red glitter and let dry. Repeat those steps to add a depth of glittery-ness if desired.


When both layers are dry, clap the shoes together outside to shake off the loose glitter, then spray with a coat of polyurethane if you feel up to it. (Not sure that step is necessary, but I had hopes that it would seal the glitter together, preventing excess glitter from getting more-everywhere than it already was.)

Now, these ruby slippers are more for functionality than fashion. The glitter is chipping away in a few spots, and the bottoms got a little goopy with the Mod Podge, but I figure that they are going to be one-time-wonders for my little gal, and they only cost me the price of glitter: $2.99. Bargain.


Today, my challenge is to put together the Dorothy dress...Again, the Ebay prices and store prices were just way more than I was willing to pay. I thought about just figuring out a dress pattern myself, but here in the eleventh hour, thought better of that notion.


So....I did spend a little on this pattern, BUT, I'm considering this an investment, as the pattern is adorable and will be used again and again. I love the work from this gal, Carla C. I have collaborated with her in the past on various projects through You Can Make This, and her work is always top-notch and so very easy to follow and professional.

I'm banking on whipping it up in a flash. I have three hours until my kiddos are home from school to get it done. My Little Missy is very stressed out about this, and keeps reminding me that she doesn't think it will be done in time because "Halloween is only 3 days away!" She just doesn't know me very well yet, does she? ;)

Thursday, September 23, 2010

A Totally Wicked Experience!


(Okay, corny title, I know...but it just fits so well!) Now that it's over, I can truthfully say that being on Studio 5 (a local NBC daytime show) was pretty "wicked", indeed.

But before I tell you about it, if you've not had a chance, be sure to stop by You Can Make This to download your FREE "Wicked" Embroidery Project that was featured on Studio 5. It consists of the Back Stitch only (perfect for beginners or experienced stitchers, alike!), and a little gluing on of some sparkling ebony crystals. Pop it into a frame, and you have a new bit of Halloween decor that features a little festive bling. You can literally finish the whole thing in just a few hours! It was designed to be quick and painless, and fun! I promise, you can do this--even if you've never tried embroidery before.

And the image below shows just the spider embroidered and sewn into a holiday door ornament. You can find the FREE download for the instructions on making this hanger HERE. (And by the way, my 6 year old helped to stitch this particular spider...I did part of it, but she did a big chunk of it and loved it! This is a great activity for the kiddos too!)


So my Studio 5 experience was really terrific, although a bit stressful at the same time! I was kept pretty darn busy with preparing for the show and keeping up with my family, and I admit, the night before the show I had a bit of a meltdown. What in the world had I agreed to? I'm too old for this kind of stress! All I could keep thinking of was those episodes of the Brady Bunch (or some classic show I remember watching) when some character happened to be on the air for the first time, and as soon as the red light from the camera came on, he or she simply stood there frozen in place, paralyzed. (And what spells "Epic Fail" more than submitting yourself to be on live TV????)

Well, after a few conversations with my hubby and my sister, and some deep breaths, they eventually talked me down off the ledge, and I started to relax a little....(Okay, so it wasn't quite that dramatic, but I was having some serious anxiety!)

Of course, I was nervous the morning of the show, but the folks there at Studio 5 were amazing. They were so friendly, and warm, and I instantly felt as though I had new friends in the world. One of the show's producers, Stephanie, that I'm here with in this photo, was especially fabulous.

She has a knack of filling you with confidence and believing in you whole-heartedly. She and I had worked on this segment together over the phone and through emails, but meeting her in person was a treat. She immediately put me at ease as she helped me set up my display and talked me through the last-minute particulars of how the segment would flow.

And then Brooke Walker, the host I worked with was remarkable as well. I have a new-found appreciation for the gifts and talents that talk show hosts/anchors have. She did not skip a beat, and knew just how to propel the conversation to help cover the details of the project I had prepared. I have watched her since with new admiration as she so aptly flows through any segment effortlessly. She is truly a kind and lovely person to work with.


And...there is a point in the segment where she ever-so-kindly rescued me from a little bobble! The one thing in the segment that I didn't prepare for was the stitching demonstration, because , well....I figured I know how to do that, right? Well, I didn't consider having to embroider with my hoop facing away from me and toward the camera. Should have practiced that part, I'm thinking now. I was holding the hoop at an awkward angle and my needle wouldn't go through the fabric with ease, and popped out of my hand. Oh, my. But Brooke found a way for us to laugh about it, and I managed to go forward.

So here is the Studio 5 segment...(just watch with kind eyes, okay? ) And don't forget to get your free download!


Sunday, July 4, 2010

Want to Combat Stress or Lose a Few Pounds? Give Hand-Embroidery a Try....


I was sitting in my dentist's waiting room when I came across a fascinating article entitled, "The Benefits of Slowing Down," from the June 2010 issue of Ladie's Home Journal. The article was all about slowing our speed in this crazy, fast-paced world that we live in, and the benefits of doing so. One section in particular captured my attention, entitled, "Slow Hobbies." Here is what it said:

"No one can knit a scarf or sweater overnight. It takes thousands of stitches, thousands of moments when the only sound is the clicking of needles. Trying to hurry the process just means making mistakes. That's not the frustration of knitting, it's the point. Slow hobbies--knitting, quilting, embroidery, woodwork--require patience and deliberation. In return they calm you, putting you in a contemplative zone that's its own kind of therapy. "The rhythmic, repetitive movements of a hobby like knitting are soothing and distracting," says Katherine Applegate, Ph.D., a clinical psychologist for the Duke University health system. "They seem to lull people."

She advises patients struggling to lose weight to take up sewing and other hands-on crafts to combat stress, which can lead to overeating. Some teachers report that knitting during class calms and focuses kids with ADHD. Even doing a jigsaw puzzle can help. The slow work of a hands-on hobby creates a pace that can soothe the soul." You can read the article in its entirety
HERE.

So there you have it...a healthy reason to allow yourself to sit on the couch and spend some time stitching or quilting an item for yourself or a friend. Remember, you can download my free set of embroidery instructions and stitches by clicking HERE, and you can purchase embroidery e-patterns HERE.

Enjoy the summer---get some sun, relax, work on a project, and reduce your stress and your waistline at the same time!

Wednesday, June 2, 2010

Make a Personalized and Inexpensive Gift for Teacher Appreciation, Graduation, Father's Day, Birthdays, Any Occasion!


It's such a busy time of year with school ending, graduation activities, Father's Day, and summer fun just around the corner! It's also a time for gift-giving, and I've got an easy, meaningful, and inexpensive gift idea for any time of the year.

Perhaps you've seen the fun that can be created with Wordle at http://www.wordle.net/. It's a creative way to display an array of words, thoughts, ideas, or phrases. I was introduced to Wordle last year, and have had such fun creating some personalized and inexpensive gifts with it. When you go to the website, just play around with it---you can change the fonts, the colors, and the layouts until you are happy with how it looks. And it's free to use! (I've provided a few "Wordle Tips" near the end of this post to help you out!)

For each of these gifts shown, I simply created my "Wordle Cloud" at the website, then after I was happy with how it looked, printed it onto an 8 1/2" x 11" sheet of vellum. I then placed the vellum over the top of an image I had downloaded and printed off of the internet. You can see that for my daughter's kindergarten teacher, I printed a simple apple; for my cutie friend who was graduating, I printed a graduation cap and changed the colors to match her school colors using Photoshop.


I then trimmed both sheets to measure 8" x 10" then inserted them together into an 8" x 10" frame with the vellum sheet over the top of the printed image. (The frame only cost me $3 from Wal-Mart.) I added a little ribbon around it, and voila! Gift complete!


I've also made these gifts for the group of Young Women I work with in my church. We gave each of them a questionnaire to fill out at one of our activities. At a special recognition meeting sometime later, the other leaders and I presented each girl with her own personalized and framed "Wordle" to take home with her unique and special qualities highlighted. They were a hit!


You are welcome to use my questionnaire if you are interested. Simply click on the image to enlarge it, then print as many as you'd like.

Some "Wordle" tips:

-The best way to begin your list of items to put into a "Wordle" document is to first create the list in a word processing document, save it, then copy and paste to the website. That way, if you need or want to start over or change anything, you don't have to re-type all of the words in the space provided at the website. You simply make changes in your word document, then paste it again.

-The more times you type a word on your list, the larger that word will appear in the image. I usually type the person's name at least 4 times, then vary other important words by typing them 2 or 3 times. This creates a more visually interesting appearance by varying the sizes of different words.

-If you have a phrase that contains 2 or more words, such as "football player", do not type it like we normally would with a space between the words. Instead, insert a tilde(with no space) which is the little squiggly line at the far left and top of the keyboard that looks like this: ~ between the words. So "football player" would be typed like this: football~player. Otherwise, the Wordle program shuffles those two words around and separates them.

-There is a FAQs section at the Wordle site that can offer more advanced tips as well!

I hope you have a great time exploring the world of Wordle, and creating one-of-a-kind gifts! I'd love for you to send me photos of what you've created to my email listed on the sidebar!


Related Posts with Thumbnails
 
Designed By Aqua Poppy Designs for Needle in a Haystack Designs.
© Copyright. All Rights Reserved.