Friday, January 18, 2013
Gear up for Valentine's Day at My Etsy Shop...Free Shipping Available!
-Shelli
Friday, November 4, 2011
Welcome Studio 5 Viewers!

I'm excited today to be chatting with Brooke and Darren over at Studio 5 once again! We'll be talking about Christmas Gift Exchange Traditions and Themes.... should be fun, and more info will follow!
For those of you who may be new to my blog, welcome! Here are the links to a few of the stitchery patterns and freebies you may see on today's show:
Wise Men shown at the top will be available at Pine Needles and My Girlfriend's Quilt Shoppe within the next week (if you are local), as well as HERE online and HERE for machine embroidery.
The Rejoice design will also be available at Pine Needles and My Girlfriend's Quilt Shoppe. You can find the hand embroidery pattern online HERE, and the machine embroidery download HERE.
Joyeux Noel Dishtowels: Pine Needles, My Girlfriend's Quilt Shoppe, You Can Make This, SWAK Embroidery.
Where We Love is Home is a free download found here at You Can Make This!
The Grace pattern is here at Pine Needles.
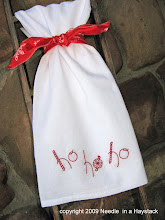
And HO HO HO is a free pattern found right here on my blog:
Thanks so much for joining me here at Needle in a Haystack! Watch for new patterns and project ideas to come in the next weeks and months!
Thursday, October 6, 2011
Welcome All Hallows' Eve -- New Stitchery Design

It's that time of year again when the ghouls and goblins will soon embark upon us in full force... Welcome the season with a new stitchery pattern from Needle in a Haystack! Bedazzled with glitter and crystals, this new home decor design will glam up any bleak corner of your home. You can find the pattern HERE.
Happy Haunting!
Monday, April 25, 2011
Studio 5: Spring Fling Felt Purse, and Kim and Kris on Rachel Ray!
My sweet friends and "Wondertwins" Kim and Kris of the DIY Dish, You Can Make This, and SWAK Embroidery, never cease to amaze me! They were on Studio 5 this morning for a short interview, and will be showcased tomorrow on the Rachel Ray Show! I'm so excited for them! I have no idea what they will be showing, as it's all a little tight-lipped, but I'm sure it will be crafty genius.

In addition, Kris showed how to make this little felt purse that I designed for You Can Make This last spring on Studio 5. It works up quickly, is inexpensive to make, and is fun for the little girls and tweens in your world to express their creativity with. Oh, and don't forget...the download is free!
Take a look:
Hope your week is going well! Hugs to you all!
Tuesday, April 19, 2011
Exciting News! Please Stop by My Store!

Yes, Needle in a Haystack now has its very own Online Store! New patterns and products are being added weekly, so be sure to check in often. All Mother's Day Patterns and this School Days Pattern are 25% off the regular price from now until the end of May!
Each pattern you see on the site will be shipped directly to your home through the mail and can easily be paid for using your Pay Pal account.
Please stop by to see what's new, and be sure to drop me a line if you have any questions!
Happy Shopping!!
Wednesday, March 9, 2011
Basic Hand-Embroidery Stitches

The website allpeoplequilt.com has some great tutorials and images for learning ten basic hand embroidery stitches: some that are in my own tutorial, as well as a few that are not. Check it out:
Basic Hand-Embroidery Stitches

In addition, they have a myriad of tips, techniques, videos, and FREE project ideas that could keep me busy for decades! My kids have so many team jerseys, along with sports and souvenir T's...I am in love with this t-shirt quilt!
Tuesday, January 18, 2011
Tricks for Tea-Dying: Easy Tutorial!

For some of my stitching projects and home decor designs, I like to create that distressed, antiqued, and aged look on the fabric I use. One of the easiest ways to do that is to tea-dye the fabric. Here is an easy tutorial to help you achieve that same antiqued look:

1. For a mottled and lightly-dyed effect as shown in the design above, simply steep one or two tea bags in a very small pot of boiling water for 5-10 minutes. Remove the bags, then crumple a fat quarter or more of muslin and place it in the pot.

Leave the fabric there for a half hour or so, (leave it longer for a darker color) without moving it around at all. The smallness of the pot seems to keep the tea from distributing through the fabric evenly, so as to get a mottled and splotchy effect. Wring out and let dry naturally, then press to remove wrinkles.

2. Now for my favorite way to tea-dye! To create a darker, stained, tea-dyed effect as shown on this Merry Halloween design, run hot water over a tea bag for a few seconds. Dab the tea bag over muslin that has been placed on a cookie sheet. Repeat as needed.

Dry fabric for approximately 10 minutes in a 200 degree oven, watching closely. Repeat process for darker muslin. You can also squeeze the water-soaked tea bag over the fabric to create a splotchy, stained look. I would recommend dying it this way before you stitch, but it can be done after as well.
Be sure to drop me a line if you have any questions!
Saturday, November 6, 2010
Blanket Stitch Tutorial
The Blanket Stitch is an embroidery stitch that provides a nice edging for blankets, table runners, bibs, burpies, table cloths, appliqued items, and anything else that needs a finished border. It can be embroidered with large stitches, or petite ones, depending on the area that you are edging, making it very versatile for a number of projects.
To Blanket Stitch around the edges of an appliqued section of fabric, simply do the following:
1. Bring the threaded needle up from underneath the fabric (be sure the floss is knotted) to the immediate left of the appliquéd fabric at point A. Pull taut, and hold floss down with your left thumb.

2. With the needle, go back down at point B, and come up again at point C, making sure the needle passes over the top of the floss you are holding with your thumb. Pull taut once again. Repeat.

To Blanket Stitch around the edges of a runner or table cloth, follow the same basic instructions above, but when coming up for the first time, simply bring your needle up at the edge of the fabric (point A). Go back down at point B, then come up from under the fabric at the edge but without catching the fabric in the needle (point C). Again, make sure your needle passes over the top of the extended floss and pull taut. Repeat.

I have a table runner that I stitched and sewed 9 years ago, designed by an incredible embroidery designer, Sandra Workman of Pine Mountain Designs. She is also the owner of Pine Needles of Gardner Village in Utah. She is extremely creative and has a myriad of darling designs that I see everywhere. Anyway...the instructions call for a blanket stitch around the edges of the runner to finish it off (at least as I remember it way back then). Well, for 9 years, I've just displayed this runner without the blanket stitch edging because I've simply not taken the time to finish it, but it has nagged at me all these years.
As I pulled out the runner just the other day to display in my entry way, I decided that this was the year to finish it off. I was tired of being reminded yearly of tasks left unfinished!
My two gals were scheduled for back-to-back haircuts yesterday, and since I can't sit still and be empty-handed for that long anyway, I figured I would make use of the hour I would be waiting there. I grabbed the runner, some floss, a needle, scissors, and away we went!
I finished most of the edging as we all chatted through the haircuts, and I finished the rest of it during my daughter's dance class. What a great feeling to accomplish something in those minutes that could have been wasted by just sitting.
Finally! A finished project just for myself--nothing to sell or give away, and after 9 years, it's finished at last! (Eleventh hour, anyone?)
Thursday, September 23, 2010
A Totally Wicked Experience!
(Okay, corny title, I know...but it just fits so well!) Now that it's over, I can truthfully say that being on Studio 5 (a local NBC daytime show) was pretty "wicked", indeed.
But before I tell you about it, if you've not had a chance, be sure to stop by You Can Make This to download your FREE "Wicked" Embroidery Project that was featured on Studio 5. It consists of the Back Stitch only (perfect for beginners or experienced stitchers, alike!), and a little gluing on of some sparkling ebony crystals. Pop it into a frame, and you have a new bit of Halloween decor that features a little festive bling. You can literally finish the whole thing in just a few hours! It was designed to be quick and painless, and fun! I promise, you can do this--even if you've never tried embroidery before.
And the image below shows just the spider embroidered and sewn into a holiday door ornament. You can find the FREE download for the instructions on making this hanger HERE. (And by the way, my 6 year old helped to stitch this particular spider...I did part of it, but she did a big chunk of it and loved it! This is a great activity for the kiddos too!)
So my Studio 5 experience was really terrific, although a bit stressful at the same time! I was kept pretty darn busy with preparing for the show and keeping up with my family, and I admit, the night before the show I had a bit of a meltdown. What in the world had I agreed to? I'm too old for this kind of stress! All I could keep thinking of was those episodes of the Brady Bunch (or some classic show I remember watching) when some character happened to be on the air for the first time, and as soon as the red light from the camera came on, he or she simply stood there frozen in place, paralyzed. (And what spells "Epic Fail" more than submitting yourself to be on live TV????)
Well, after a few conversations with my hubby and my sister, and some deep breaths, they eventually talked me down off the ledge, and I started to relax a little....(Okay, so it wasn't quite that dramatic, but I was having some serious anxiety!)
Of course, I was nervous the morning of the show, but the folks there at Studio 5 were amazing. They were so friendly, and warm, and I instantly felt as though I had new friends in the world. One of the show's producers, Stephanie, that I'm here with in this photo, was especially fabulous.
And then Brooke Walker, the host I worked with was remarkable as well. I have a new-found appreciation for the gifts and talents that talk show hosts/anchors have. She did not skip a beat, and knew just how to propel the conversation to help cover the details of the project I had prepared. I have watched her since with new admiration as she so aptly flows through any segment effortlessly. She is truly a kind and lovely person to work with.
And...there is a point in the segment where she ever-so-kindly rescued me from a little bobble! The one thing in the segment that I didn't prepare for was the stitching demonstration, because , well....I figured I know how to do that, right? Well, I didn't consider having to embroider with my hoop facing away from me and toward the camera. Should have practiced that part, I'm thinking now. I was holding the hoop at an awkward angle and my needle wouldn't go through the fabric with ease, and popped out of my hand. Oh, my. But Brooke found a way for us to laugh about it, and I managed to go forward.
So here is the Studio 5 segment...(just watch with kind eyes, okay? ) And don't forget to get your free download!
Monday, September 20, 2010
A "Wicked" Little Sneak Peek!

Something "Wicked" this way comes! See a sneak-peek today on Studio 5 and go to You Can Make This for a FREE download of this new project!
Happy Stitching!
Wednesday, September 15, 2010
Pine Needles...A Favorite Quilt Shop Featured in the "Quilt Sampler", and a Surprise!

I received a marvelous treat in the mail the other day! A magazine I had been waiting for from a quilt shop that I adore, along with a few fat quarters of festive Halloween fabric for my latest project (news about that to come later!).

First, the magazine is the Fall/Winter 2010 issue of the Quilt Sampler, which, a couple of times a year, features 10 fabulous quilt shops around the country (this issue actually has 11). And, the fun news is that one of my designs and patterns happened to show up in a photo inside the magazine! What a great surprise!
(I'm a lucky gal, as this is the second time a design of mine has appeared in this magazine. The other was a few years ago when the magazine featured The Gathering Place, a shop in Idaho that has carried several of my patterns as well. The design shown was "Spring Flowers" as you can see in the photo below.)

So the issue of the magazine this month features one of my favorite quilt shops of all time: Pine Needles in Historic Gardner Village, near Salt Lake City, Utah. As a quilt shop, it is enchanting to visit...the displays are ever-changing with new designs, fabrics, and patterns gracing the walls and peeking from the nooks and crannies. I am inspired every time I visit! There is a plethora of amazing designs and patterns for quilts, table runners, pin cushions, pillows, aprons, and more, that feature hand-embroidery, cross-stitch, quilting, or punch-needle.

The design, "My Dad" from Needle in a Haystack (me!) is shown in one of the photos that were taken inside the shop and printed in the magazine. I was giddy when I heard the news! You can see it in section 3 below.

But the real reason that Pine Needles will forever hold a special spot in my heart, is because it is the place where Needle in a Haystack got its start. About 8 years ago, I was fiddling with my own embroidery designs, wanting to do more with them, but not sure how or where to break into the market. I happened to have one of my stitched designs with me on an outing to Pine Needles and was looking for some coordinating fabric, when one of the store's managers, Holly, spotted the design in my hand. She asked where I got that pattern, and when she found out I had designed it myself, she encouraged me to write up the directions, offer a sample for the store to display, and bring her the patterns to sell. I was thrilled, and so grateful that someone believed in my designs and was willing to take a chance on them.
Some time down the road from that day, my little company, Needle in a Haystack was born. From that time, Pine Needles has been my best customer for in-store patterns, and one of my biggest cheerleaders. The ladies there are fabulous, and Holly, especially, has become a sweet and supportive friend over the years. Follow this link to learn more about their store and blog, and click here to see Needle in a Haystack patterns that are available through Pine Needles.
So, yes, what a great day to see that Pine Needles was featured in the Quilt Sampler---their cozy, friendly, and trendy store truly deserves it! And what a great day for my little business to be associated with them.
Sunday, July 4, 2010
Want to Combat Stress or Lose a Few Pounds? Give Hand-Embroidery a Try....
I was sitting in my dentist's waiting room when I came across a fascinating article entitled, "The Benefits of Slowing Down," from the June 2010 issue of Ladie's Home Journal. The article was all about slowing our speed in this crazy, fast-paced world that we live in, and the benefits of doing so. One section in particular captured my attention, entitled, "Slow Hobbies." Here is what it said:
"No one can knit a scarf or sweater overnight. It takes thousands of stitches, thousands of moments when the only sound is the clicking of needles. Trying to hurry the process just means making mistakes. That's not the frustration of knitting, it's the point. Slow hobbies--knitting, quilting, embroidery, woodwork--require patience and deliberation. In return they calm you, putting you in a contemplative zone that's its own kind of therapy. "The rhythmic, repetitive movements of a hobby like knitting are soothing and distracting," says Katherine Applegate, Ph.D., a clinical psychologist for the Duke University health system. "They seem to lull people."
She advises patients struggling to lose weight to take up sewing and other hands-on crafts to combat stress, which can lead to overeating. Some teachers report that knitting during class calms and focuses kids with ADHD. Even doing a jigsaw puzzle can help. The slow work of a hands-on hobby creates a pace that can soothe the soul." You can read the article in its entirety HERE.
So there you have it...a healthy reason to allow yourself to sit on the couch and spend some time stitching or quilting an item for yourself or a friend. Remember, you can download my free set of embroidery instructions and stitches by clicking HERE, and you can purchase embroidery e-patterns HERE.
Enjoy the summer---get some sun, relax, work on a project, and reduce your stress and your waistline at the same time!
Monday, June 14, 2010
A Heart-Felt Gift for the Hero of the House

Okay, Friends...
Father's Day is less than a week away, and if any of you are like me (I hope you're not), there is a slight chance that you've not found just the right thing for your Man on his big day of the year. Perhaps life is running at full speed, and you just haven't found the time to even focus your mind on the fact that Father's Day is this coming Sunday--(aack!)
Well, if you are wanting to make something from the heart to honor the Hero of the House, you have just enough time to do so. Here are some ideas that will whip up in a few hours and put a smile on your man's face---especially if you and the kids all take part:
"My Dad"

Dad has many roles. Remind him how grateful you are for all he does. Stitch these phrases on an old button-down shirt of his, frame it with a few choice photos and trinkets, and you'll have a keepsake that he will treasure for years to come. Since the embroidery stitches are relatively easy, (back stitch and French knots) even the little ones can make a few stitches with the needle and floss, and feel a part of the process. The "un-perfectness" of it all will make it that more special and heart-felt.

"i Love U"

This simple design will literally take less than an hour to put together, but the impact will be lasting. Create this image with a bit of fabric, transfer web (iron on) paper (found at your local fabric store) and a bit of embroidery floss. Stitch it on a special pillow case for him and have the kids trace and stitch their names along side it; or how about stitching it on a grilling apron; or place in a simple frame as a sweet reminder to display on his desk.
The pillow case I created in the photo was for my son who loves the Steelers. You could easily use a fabric choice that best represents your man (and of course you could sign and stitch your name and the kids' names rather than "mom"!) We purchased a John Deere tractor print to iron on and stitch to an apron for Grandpa. The possiblities are endless!
Both designs are available in downloadable stitchery e-patterns found HERE, and in machine embroidery formats found HERE. And don't forget...if you need a reminder or a lesson on how to embroider any stitches, download the FREE tutorial found HERE.
Enjoy this week as you prepare to make Dad's day special! Please contact me if there is ever a question about one of my designs that I can help you with!