Friday, July 31, 2009

"CHRISTMAS AT THE END OF JULY" GIVE-AWAY!


So, my friends, I have a surprise for you! I couldn't very well have a Christmas in July pattern promo, and not have a fun give-away to go with it! (Even though July is now over!)

I'm giving away a "Needle in a Haystack" Christmas shelf pillow that is just perfect to be tucked inside the branches of, or underneath your Christmas tree, positioned near the fireplace, or placed atop a shelf during the holiday season. It measures approximately 7" x 8".

The hand-embroidery pattern for this design has been available only seasonally so far, and will soon be available for purchase online. I'll be sure to keep you posted on that! But for those of you out there who machine embroider, you are in luck, as the design is already available here at SWAKembroidery.com if you are interested.

You have until Sunday, August 9 at midnight to enter, and the winner will be chosen through a random drawing and posted on Monday, August 10. Here's how you can enter:

1. Leave me a comment on this post, and let me know you're out there!

2. Become a follower, or if you are already a follower, leave me a comment to add another chance for winning.

3. Post about this give-away on your own blog, and leave me a comment with your blog address to let me know where I can find it.

4. Grab a "Needle in a Haystack" button and again, leave me a comment to let me know where I can find it.


So, you have four chances of winning! Tell your friends, spread the word, and good luck!

Sunday, July 26, 2009

IT'S CHRISTMAS IN JULY! Free Christmas Embroidery Pattern; Learn How to "Back Stitch"


Can you believe Christmas is just around the corner? Before we know it, the snow will be flying, and Santa will be stopping by for a visit. And what better time to start thinking about all those gifts to give than now?

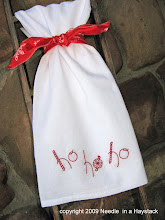
I've got a festive stitching design to get you started right away! Now, we're all on a little bit tighter budget this year, right? This hand-embroidered dishtowel is an economical gift that will be perfect for school teachers, dance and piano teachers, neighbors, co-workers, or friends. And... they will be so amazed and impressed that you made it yourself.


Now I've heard some of you say that you simply don't understand how to embroider, or you just don't have time or patience for it....Well, I'm here to dispel those myths! I'm going to walk you through everything right here that you need to know to complete this stitching project. There is only one stitch to learn, and it's so simple, even your kids will be able to join in on the fun. (And with a month left of summer, keeping them busy will be a bonus!) I promise. You can totally do this.

The trick with hand stitching is that you take it with you everywhere. I keep my current project in a little bag, and keep it near my purse so I remember to take it with me. I'm always amazed at how much I can stitch in the 5 minutes I'm waiting in the car when I pick up my kids from school. How many hours do we spend in the doctor's or dentist's offices? Or at dance or piano lessons, or sporting practices and events? And I don't know about anyone else out there, but I have a hard time just sitting down to watch T.V. or a movie. Stitching is a wonderful activity to help you feel productive while relaxing on the couch.

To get started, you'll need the following supplies:

* A washed and pressed white "flour-sack" dishtowel. Several online stores sell them such as this one, or Wal-Mart and Target carry them for about a dollar a piece.


*DMC floss in RED--any Christmassy shade you like. Michael's, JoAnn's, Hobby Lobby, Robert's, or any quilting shop will carry it.


*Embroidery hoop. A small, 4" to 6" hoop will work nicely. Again, found at the stores listed above.


*Needle. You can purchase a variety pack of several lengths and widths to find one you are comfortable with. Also available at the stores listed previously.


*A fine-tipped (about .05) permanent brown marking pen such as a "Zig" found at most craft stores. (Brown is simply my preference. Black will work as well, but is a little more difficult to cover up with your stitches.)


Now, Get Ready to Stitch:


1. Click on the image and print the pattern. Feel free to enlarge or reduce it to the size you'd like. The original measures about 2" tall x 5" wide.

2. Tape the pattern to a sunny window or a tracing box. Tape the dishtowel over the top of the pattern, centering the bottom mid-point of the towel over the verse. (You can also trace the pattern in one of the corners. Either will work just great.) With the pen, carefully trace the words onto the dishtowel.

3. Place the dishtowel into the embroidery hoop and pull it taut at the edges. Tighten the hoop to keep the fabric in place.

4. Embroidery floss has 6 strands of thread. Cut about a yard's length, and separate the strands so that you have two lengths of 3 strands each. Set one length aside. Thread the other length through the needle, and tie a knot in the end. You are now ready to stitch!

The embroidery stitch you'll be using for this entire project is called the Back Stitch. Let me show you how it works:

How to Back Stitch -- This is a basic and frequently used embroidery stitch. The Back Stitch works from right to left if you are right handed. (Simply reverse the direction if you happen to be left-handed.) Make sure your floss is knotted, and holding your needle in your right hand, bring it up from underneath your fabric at point A and pull taut. Put your needle back down at point B and without pulling your needle all the way through your fabric, come back up at point C.


Now pull the needle and floss taut. Repeat this action until you have stitched across the length of your line.
There are two tips that will make your Back Stitch look lovely: Be consistent in the length of your stitches--between 1/16” and 1/8” is about right, and after you come up at point C and prepare to repeat, be sure to insert your needle right back down into the same hole as the floss is where you last came up. This creates a continuous and fluid line of stitches.


See? You can so do this.

Stitch the Design:

5. Be sure the floss is knotted, and begin at the first "h". Stitch all lines with the Back Stitch, and when the "h" is complete, tie a knot underneath the fabric and clip the floss.

6. Tie another knot in the threaded floss, and continue on to stitch the "o" with the Back Stitch. Tie a knot underneath once again, and repeat until everything has been stitched. This is what it will look like underneath when you have finished stitching.


Remove the dishtowel from the hoop and press with a hot iron.

Now that you've completed stitching your dishtowel, you can get creative with your presentation as you give it away. Try some of the following:


Line a basket with the dishtowel and fill with bread or goodies. The "Autumn Glory" pattern in the photo above is available here.


Use it to wrap around a bottle of sparkling cider or a jar of canned preserves. This "Believe" pattern is also FREE and available here:


Or, simply roll it up and tie with a ribbon.

For additional detailed information on other embroidery stitches, as well as tea-dying fabric, framing, and an additional free pattern, download this free eBook entitled "Stitching Essentials."


You may find other stitchery e-patterns from Needle in a Haystack to order and download here, and you may also find patterns to order by mail here.

Enjoy your free pattern as well as your new skills, and "Merry Christmas in July" from Needle in a Haystack!

Wednesday, July 22, 2009

Our Family's Top 12 "Not-to-be-Missed Experiences" along the Oregon Coast


Is it just me, or have we blinked and summer is just about over? We've been so busy since the day school got out, (which for us was just July 2--crazy huh?) that I've hardly had time to sit down at my computer to post or read. I've missed you all!

So what has kept us so crazy busy? Well, amongst other things, a family vacation to the Oregon Coast. We were gone for 10 days, and it was fabulous! If you are ever considering visiting there, I highly recommend it! I have to send a shout-out to my friend, Leigh Anne at yourhomebasedmom.com, who lives in the Portland area, and sent me an extensive list of places to visit! Thanks so much, Leigh Anne!


Based on our traveling encounters, here are our family's suggested Top 12 "Not-to-be-Missed Experiences" of the Oregon Coast:

12. The Sea Lion Caves in Florence, Oregon.


Not the kids' favorite activity, but impressive to see (and hear) so many sea lions in one spot. The cave was definitely dark, damp, and loud---Little Missy couldn't get out of there fast enough!

11. Heceta Head Light House, one of the few remaining working lighthouses along the coast.


The mystery and intrigue of the world of lighthouses is fascinating to me. You definitely have to visit at least one. Wish that we could have seen more.

10. Tillamook Cheese Factory.


Here you can see the cheese-making process from the time milk is poured into gigantic vats to packaging the end product. The best part is the cheese sampling and ice cream cones at the end!

9. Shopping the Outlet Mall in Seaside.

Did you know that Oregon has no sales tax? We were giddy about purchasing new tax-free shoes!


8. Skim Surfing.


We discovered something about our first day at the beach. The water in Oregon is SO cold! Too cold for much swimming or boogie boarding without wet suits. But we saw a few kids trying this on our first venture onto the beach, and it looked like great fun, and my boys decided to give it a try. From the beach, the board is tossed ahead of you onto the lapping water as you run and hop onto it like a skate board. (Um, no. I chose to retain some dignity by not trying. Just in case you were wondering.) If you are not intimidated by snowboarding or skateboarding, this is something you (or your kids) should definitely take a crack at. Several shops in the beach-front towns carry them. We purchased ours in Seaside for about $25.00.

7. "The Buzz on Broadway" Candy Shop in Seaside.


What a treat (no pun intended!) it is to visit this shop! Carolyn, the owner, befriended our family instantly, and made our experience there simply delightful. She offered us a free sample of any taffy we wanted throughout the entire store, and then held a contest amongst our family to see which kid could hold a straight face the longest while sampling a horribly sour candy called "Toxic Waste". She told us her favorite spots along the coast to visit, and we had such an enjoyable time chatting with her. Her hospitality was through the roof.

In addition to a large selection of candy and fudge, one other interesting aspect about Carolyn's store is her selection of unique concoctions. She and her employees serve chocolate-covered Twinkies, Oreos, Pringles, (and get this) chocolate-covered bacon. Yep, bacon. And they told us it was one of their top sellers. We weren't that adventurous, but my 14 year old bought 3 different chocolate-flavored versions of the Twinkies: cherry, strawberry, and lemon. Boy, was it a challenge pulling everyone out of that store!

6. Mo's Restaurant at Cannon Beach.


There are several along the coast, but this happened to be the location we visited. We had to wait for a window table, but it was well worth it to view Haystack Rock and watch the ocean and clouds move in while we ate. Very family friendly, affordable and the food is terrific. Everyone in the family was brave to try some sort of sea food (clam chowder, fish and chips, or salmon) and loved it, except for Miss Blondie. She stuck to her tried and true Mac 'n' Cheese.

5. Hiking the Rainforest.


That's certainly what it felt like! We took a few short hikes--one at Fort Stevens State Park, and one along the Hobbit Trail near the Carl G. Washburne Memorial State Park. It was amazing to me to realize as we were hiking through this lush greenery--complete with ferns, dense undergrowth, chattering animals, and moss draping from the twisting and knotted trees, --that we were just minutes away from the ocean and sandy beaches. Don't miss the opportunity to explore such beautiful and unique scenery.

4. Exploring the Tide Pools.


While we were there, low tide occurred in the early evening, which is when we most often found ourselves at the beach. During low tide, the bases of the rocks are exposed, leaving small pools of water, and allowing for exploration of sea life, which was so fascinating. We saw millions of mussels, snail-like creatures, anemones, and best of all, sea stars in a variety of colors, ranging from deep purple to orange to red. The trick is finding a beach in a somewhat protected cove with rocky shores. Good spots for this are Cannon Beach, Hug Point, and Carl G. Washburne Memorial. Amazing to say the least, and definitely a favorite activity!


3. Kite Flying.


The other thing we discovered quickly about the Oregon beaches is that not only is the water cold, but the wind blows there almost constantly. The Oregonians make the best of this, and have kite-flying festivals at some of the beaches. We tried flying a stunt kite--a fancier version of kite flying than we'd attempted before--and had fun trying to maneuver it into figure eights and loop-de-loops.


2. Beach-combing and Playing in the Sand at a Variety of Beaches.


Of course, this sounds like a no-brainer, but we visited 6 different beaches, and I found it interesting that each beach had something different to offer. One location had dozens of sand dollars on the shore--mostly broken, but my oldest son found a whole one---the only of the trip. Another beach was speckled with rounded and worn rocks, and another still with smoothed and seemingly fossilized sea shells. One beach was so pristine--hardly anything at all on the shore--but the kids found mole crabs and jelly-like creatures in the water, and it was here we explored the tide pools.


And of course, who can miss the opportunity to bury your sibling in the sand, or draw larger-than-life versions of your name in it with a rock? Endless fun.


1. Visiting the Beach at Sunset.


Most nights and days we were at the beach were overcast and cloudy. But one magical night the clouds broke and we experienced the most gorgeous of sunsets reflecting upon the ocean. Wow. What a way to put the icing on the cake of our vacation.

So there you have it--our family's new favorite vacation. We had so much fun, and wished we'd had even more time to explore all the other recommendations we'd received. For great information on visiting the Oregon Coast, go to http://visittheoregoncoast.com/. It is chock-full of interesting info, stories, and all things related to traveling the coast.

What are your favorite vacation spots and why? I'd love to hear, as the kids are already looking forward to planning next year's adventure!
It's good to be back!

Related Posts with Thumbnails
 
Designed By Aqua Poppy Designs for Needle in a Haystack Designs.
© Copyright. All Rights Reserved.