Thursday, October 28, 2010

Mod Podge and a Little Glitter to the Rescue: Ruby Slippers in a Flash...and Cheap!


For those of you who know me well, you may recognize the trait in me that quite often, some of my best work is done in the 11th hour...It's not that I try to procrastinate. Rather, I stew or ponder on things, am busy with a plethora of additional priorities, but finally, when the hour of accountability is here, quick decisions must be made, and I am thrown into action.

My Halloween costumes are no exception! My littlest one wants to be Dorothy from the Wizard of Oz this year. Like many people I know, my budget for costumes that might be worn twice EVER is pretty slim. Okay, really slim. I looked for used ruby slippers on Ebay, but even then after shipping, the costs were near $15 to $20. Not sure of how to spend as little as possible and still meet her desires, I put it on the back burner of my brain and let the notion stew...

As I was cleaning out my daughter's closet the other day, I came across this pair of old Sunday shoes with the toes worn out. I was about to toss them into the garbage when the light went off in my head! These were just the Ugly Duckling version of Ruby Slippers!!!


A trip to the store for red glitter and a little digging in my craft closet for Mod Podge and a foam brush, and I was set. Now mind you, glitter is not for the faint of heart...It was easy as pie, although my house is glittering from end to end with sprinkles of red glitter. Ah, well....it vacuums, right?

Just in case you happen to be needing a last-minute costume like me, I've got your back! The first step of "Ruby Slipper Transformation" is to stuff the shoes with newspaper and paint the shoes with a layer of Mod Podge. Sprinkle the red glitter and let dry. Repeat those steps to add a depth of glittery-ness if desired.


When both layers are dry, clap the shoes together outside to shake off the loose glitter, then spray with a coat of polyurethane if you feel up to it. (Not sure that step is necessary, but I had hopes that it would seal the glitter together, preventing excess glitter from getting more-everywhere than it already was.)

Now, these ruby slippers are more for functionality than fashion. The glitter is chipping away in a few spots, and the bottoms got a little goopy with the Mod Podge, but I figure that they are going to be one-time-wonders for my little gal, and they only cost me the price of glitter: $2.99. Bargain.


Today, my challenge is to put together the Dorothy dress...Again, the Ebay prices and store prices were just way more than I was willing to pay. I thought about just figuring out a dress pattern myself, but here in the eleventh hour, thought better of that notion.


So....I did spend a little on this pattern, BUT, I'm considering this an investment, as the pattern is adorable and will be used again and again. I love the work from this gal, Carla C. I have collaborated with her in the past on various projects through You Can Make This, and her work is always top-notch and so very easy to follow and professional.

I'm banking on whipping it up in a flash. I have three hours until my kiddos are home from school to get it done. My Little Missy is very stressed out about this, and keeps reminding me that she doesn't think it will be done in time because "Halloween is only 3 days away!" She just doesn't know me very well yet, does she? ;)

Wednesday, October 6, 2010

The Crazy Halloween Dinner Tradition...Revisited


Last fall, I posted about our family's tradition of the Crazy Halloween Dinner. I had several people contact me for more details, so I thought I'd revisit this post again, but a little earlier in the season. It is such great fun! But BEWARE: After doing it once with your family, you just may be coerced into doing it again and again! Your kiddos and any guestswill love it.

Here is how it works:

As the hostess, begin by planning your menu for the evening. For us it generally consists of regular meal items such as chicken and potatoes, barbecued beef sandwiches, or some type of casserole. But as you can see in the photo above, my niece planned her menu using some unique food choices for the occasion. Either way works great...just don't feel pressure to fix anything out of the ordinary. The food itself is not necessarily the entertaining part of this meal...it is how it's presented that makes it such fun!

So, begin listing your menu items so that you have 12 things on your menu, but these will also include a drink, each of your utensils, and a perhaps a napkin. Here is an example:

1. Spaghetti and Meatballs
2. Green salad and dressing
3. Buttered peas
4. Garlic bread
5. Fresh fruit
6. Jello salad
7. Punch to drink
8. Pumpkin cheesecake for dessert
9. Napkin
10.Fork
11.Knife
12.Spoon

The next step is to get creative and assign a spooky and crazy name that provides a subtle hint as to what each menu item might be. For example, the garlic bread could be called "Tombstones"; the punch could be "Witches Brew"; and the spaghetti and meatballs...well, I'm sure you could come up with something that sounds totally disgusting!

Now create a menu that lists each of the crazy names on them, and a space in which to write the numbers 1, 2, or 3, which will designate which course that item will be served in. You will be serving 3 courses of four food items. (You could also serve 4 courses of three food items if desired.) Be sure to make a master "key" so you can easily remember what each food items are called!

The following is menu and key from a few years ago that you can use if you'd like. Just click to enlarge, and print.

When your guests arrive, give each person a menu and have them choose their food items for each course by numbering them 1, 2, or 3. The fun of this is that your guests won't know exactly what they are ordering, and little will they know that they are ordering their utensils as well! Be sure that each guest's name is on his or her menu, then collect them before you begin serving.

I line up all the menus on my counter, then dish up each person's plate according to what they ordered, then serve one at a time. After everyone is finished with their first course, I take their plates back (and any utensils they had for that course) and serve them their second course and so on. My hubby usually helps, so it goes quite quickly, and everyone is happy to chat for a bit between courses. And, the family who first introduced this tradition to us gave us this tip...that once a person's drink is served, he can keep his cup for refills throughout the rest of dinner. That is usually very appreciated!

Every year, someone inevitably orders their spoon, a knife, a side dish, and a roll for one course, and in the next they have their dessert, a main dish, a napkin, a drink, and no silverware. Yep, a little crazy, but lots of fun! It's especially entertaining when we have another family over to share the surprises with.

Last year, my niece and her husband hosted our dinner, so it was entertaining for me as well, as I didn't have a clue what I was ordering either! They were great hosts and came up with unique new dishes that our family hadn't tried before, which made it extra fun for us all!

The most popular and talked about dish of the night? The "Kitty Litter!" It consisted of vanilla pudding topped with crushed graham crackers and an occasional melted tootsie roll that looked like...well, you know what. Rather disgusting, but delightful for the youngsters at the same time!

Here is Blondie determining which menu items she wanted for each course:


A.W. had to eat his "Ogre Buttocks" (ham) and "Sliced Snail" (pumpkin roll) with a knife:


And by the time Blondie got to this course, she had no silverware!


It was a great night, and filled with some entertaining memories! The Crazy Halloween Dinner is a now a standard tradition in our home. If you give it a try, I would love to hear about your menus and how you made it special for your family.


Tuesday, September 28, 2010

Ode to Summer....

Goodbye, Summer. We shall miss your warmth and the happy experiences you provided for us:

S'mores...


Ladder-ball tournaments...


King of the hill... (Let me explain this one. My son back-packed a golf club and 20 balls on a trek to the highest peak in Utah with his scout troop so he could hit them off the peak. Notice his buddy holding onto his belt loop as he swings so he doesn't have a mishap and fly right off the mountain along with his golf balls. Yeah...it's best that mom's don't know these details until they're home again.)


Ice cream treats from Aunti Em's and Uncle Kel's store...


The Pioneer Trek Experience...


Geode treasures...


Hiking Bryce Canyon...


A little jail time...


Target practice at Bryce Canyon...


Broken arms...(okay, not so much)


Father's Day and homemade ties...


The beginning of football season...

Militia men in training...


Thanks for the memories, Summer...

Thursday, September 23, 2010

A Totally Wicked Experience!


(Okay, corny title, I know...but it just fits so well!) Now that it's over, I can truthfully say that being on Studio 5 (a local NBC daytime show) was pretty "wicked", indeed.

But before I tell you about it, if you've not had a chance, be sure to stop by You Can Make This to download your FREE "Wicked" Embroidery Project that was featured on Studio 5. It consists of the Back Stitch only (perfect for beginners or experienced stitchers, alike!), and a little gluing on of some sparkling ebony crystals. Pop it into a frame, and you have a new bit of Halloween decor that features a little festive bling. You can literally finish the whole thing in just a few hours! It was designed to be quick and painless, and fun! I promise, you can do this--even if you've never tried embroidery before.

And the image below shows just the spider embroidered and sewn into a holiday door ornament. You can find the FREE download for the instructions on making this hanger HERE. (And by the way, my 6 year old helped to stitch this particular spider...I did part of it, but she did a big chunk of it and loved it! This is a great activity for the kiddos too!)


So my Studio 5 experience was really terrific, although a bit stressful at the same time! I was kept pretty darn busy with preparing for the show and keeping up with my family, and I admit, the night before the show I had a bit of a meltdown. What in the world had I agreed to? I'm too old for this kind of stress! All I could keep thinking of was those episodes of the Brady Bunch (or some classic show I remember watching) when some character happened to be on the air for the first time, and as soon as the red light from the camera came on, he or she simply stood there frozen in place, paralyzed. (And what spells "Epic Fail" more than submitting yourself to be on live TV????)

Well, after a few conversations with my hubby and my sister, and some deep breaths, they eventually talked me down off the ledge, and I started to relax a little....(Okay, so it wasn't quite that dramatic, but I was having some serious anxiety!)

Of course, I was nervous the morning of the show, but the folks there at Studio 5 were amazing. They were so friendly, and warm, and I instantly felt as though I had new friends in the world. One of the show's producers, Stephanie, that I'm here with in this photo, was especially fabulous.

She has a knack of filling you with confidence and believing in you whole-heartedly. She and I had worked on this segment together over the phone and through emails, but meeting her in person was a treat. She immediately put me at ease as she helped me set up my display and talked me through the last-minute particulars of how the segment would flow.

And then Brooke Walker, the host I worked with was remarkable as well. I have a new-found appreciation for the gifts and talents that talk show hosts/anchors have. She did not skip a beat, and knew just how to propel the conversation to help cover the details of the project I had prepared. I have watched her since with new admiration as she so aptly flows through any segment effortlessly. She is truly a kind and lovely person to work with.


And...there is a point in the segment where she ever-so-kindly rescued me from a little bobble! The one thing in the segment that I didn't prepare for was the stitching demonstration, because , well....I figured I know how to do that, right? Well, I didn't consider having to embroider with my hoop facing away from me and toward the camera. Should have practiced that part, I'm thinking now. I was holding the hoop at an awkward angle and my needle wouldn't go through the fabric with ease, and popped out of my hand. Oh, my. But Brooke found a way for us to laugh about it, and I managed to go forward.

So here is the Studio 5 segment...(just watch with kind eyes, okay? ) And don't forget to get your free download!


Monday, September 20, 2010

A "Wicked" Little Sneak Peek!


Something "Wicked" this way comes! See a sneak-peek today on Studio 5 and go to You Can Make This for a FREE download of this new project!

Happy Stitching!

Wednesday, September 15, 2010

Pine Needles...A Favorite Quilt Shop Featured in the "Quilt Sampler", and a Surprise!


I received a marvelous treat in the mail the other day! A magazine I had been waiting for from a quilt shop that I adore, along with a few fat quarters of festive Halloween fabric for my latest project (news about that to come later!).


First, the magazine is the Fall/Winter 2010 issue of the Quilt Sampler, which, a couple of times a year, features 10 fabulous quilt shops around the country (this issue actually has 11). And, the fun news is that one of my designs and patterns happened to show up in a photo inside the magazine! What a great surprise!

(I'm a lucky gal, as this is the second time a design of mine has appeared in this magazine. The other was a few years ago when the magazine featured The Gathering Place, a shop in Idaho that has carried several of my patterns as well. The design shown was "Spring Flowers" as you can see in the photo below.)


So the issue of the magazine this month features one of my favorite quilt shops of all time: Pine Needles in Historic Gardner Village, near Salt Lake City, Utah. As a quilt shop, it is enchanting to visit...the displays are ever-changing with new designs, fabrics, and patterns gracing the walls and peeking from the nooks and crannies. I am inspired every time I visit! There is a plethora of amazing designs and patterns for quilts, table runners, pin cushions, pillows, aprons, and more, that feature hand-embroidery, cross-stitch, quilting, or punch-needle.


The design, "My Dad" from Needle in a Haystack (me!) is shown in one of the photos that were taken inside the shop and printed in the magazine. I was giddy when I heard the news! You can see it in section 3 below.

But the real reason that Pine Needles will forever hold a special spot in my heart, is because it is the place where Needle in a Haystack got its start. About 8 years ago, I was fiddling with my own embroidery designs, wanting to do more with them, but not sure how or where to break into the market. I happened to have one of my stitched designs with me on an outing to Pine Needles and was looking for some coordinating fabric, when one of the store's managers, Holly, spotted the design in my hand. She asked where I got that pattern, and when she found out I had designed it myself, she encouraged me to write up the directions, offer a sample for the store to display, and bring her the patterns to sell. I was thrilled, and so grateful that someone believed in my designs and was willing to take a chance on them.

Some time down the road from that day, my little company, Needle in a Haystack was born. From that time, Pine Needles has been my best customer for in-store patterns, and one of my biggest cheerleaders. The ladies there are fabulous, and Holly, especially, has become a sweet and supportive friend over the years. Follow this link to learn more about their store and blog, and click here to see Needle in a Haystack patterns that are available through Pine Needles.

So, yes, what a great day to see that Pine Needles was featured in the Quilt Sampler---their cozy, friendly, and trendy store truly deserves it! And what a great day for my little business to be associated with them.

Sunday, August 29, 2010

The Happiest Place on Earth! 10 Suggestions for a Magical Experience at Disneyland


Summer has been jam-packed at my house, as you can see from the sparse amount of posts I have written. With school back in session, however, I'll be posting more regularly again...I'm so excited to show you what's coming up in the stitching world! Lots to look forward to!


But for now, I wanted to share some of our summer fun with you. We returned earlier this year from a fantastic few days at the Happiest Place On Earth! We had such a marvelous time that none of us wanted to leave.


The park is clean, classy, and of course, magical in every way. I am, in no way an expert in all of the ins and outs of Disneyland. However, I am a bit of a guide book junkie whenever we are planning a vacation. My favorite guide book that offered us the most help was The Unofficial Guide to Disneyland, but I also got some good info from Fodor's Disneyland and Southern California with Kids.I have gleaned several things that were beneficial in the planning of our vacation, and I've developed my own opinions about some things we discovered ourselves.

In case you are planning a trip in the near future, and wondering about some Disneyland-ish possibilities in addition to the main attractions, here are 10 of my favorite suggestions for a truly magical experience at Disneyland:

1. Purchase a Unique and One-of-a-Kind Souvenir.
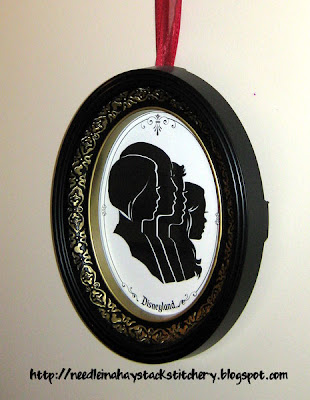


So this is my favorite find at Disneyland this trip! I had read about this little Silhouette Shop on Main Street, and was instantly intrigued with the concept of this personalized souvenir.

The shop itself teeny-tiny with only enough room for a few people at once. The artist has worked for Disney for 30 years; 3 years as a watercolor artist, and 27 as a silhouette artist. I was blown away when I saw her work! She is amazingly talented.


She simply has you sit so she can see your profile, and in a matter of about 30 seconds (I'm not kidding!) she snips, snips, snips your silhouette from 2 sheets of paper while she chats away with you. No drawing or anything. It was the coolest thing to watch! She can do individual silhouettes or layer several profiles if desired like we did. The cost is under $10 per person, and you get not one, but two sets of silhouettes to frame.

I love this little memoir to remind me of how my kiddos looked when we went to Disneyland! If we ever get a chance to go back, I'll be stopping in again for an updated souvenir.

2. Tickle your Tastebuds.


If you have visited Disneyland without stopping at the Dole counter just outside the Tiki Room, you have missed out! They have the most delicious and refreshing pineapple whips, and they are by far the best bargain in the park (well, food-wise, at least).


We returned again on another day for a second helping and enjoyed them just as much! Definitely worth the stop. (And if you see a line forming outside, just go through the gate toward the Tiki Room, and get in line over on that side...we hardly saw anyone over there, and got our treats much faster that way.)

3. Face your Fears.


So three years earlier, my hubby had taken the boys on the Tower of Terror, and swore he was never setting foot on that ride again! For him, it was the worst ever. I was designated as the adult to accompany the kids, and of course was a little hesitant after hearing him describe his *traumatic* experience. However, my boys thought the ride pretty much rocked, so they convinced my Blondie to join us as well, much to her disdain.


My greatest regret of the whole trip was not purchasing this photo. We snapped it on the way out however, and you can see my boys and I actually having a great time on this ride, and poor Blondie not sure what to think! I laugh every time I look at it.

When it was all said and done, and she realized that she had survived this ordeal, she said she was glad that she went, and wanted to do it again, which we did! Despite my hubby's grim description of this ride, the rest of us found it to be one of our favorites...even Blondie. She was glad she had faced that fear. (Me too!)

4. Take a Photo with a Character.


The characters were not our main draw in Disneyland, but by the second day, the girls couldn't help but wait for a few minutes to meet some of the characters and to get their autographs. (We purchased an inexpensive autograph book at a kiosk and a large pen to make it easier for the characters to sign with.) It became a fun game for us to see who we could spot, and to see how short of a time we could wait in line.


Cinderella was the first character we had the chance of meeting over in Disney's California Adventure. Can you see the sheer glee on my little one's face?

5. Torture your Teen.


How often do we have an opportunity to do this? A Small World is the perfect place for some parental revenge. Savor the moment!


6. Channel your Inner Hillbilly.


One of our favorite stops for lunch is the Golden Horseshoe in Frontierland. The food is not unique, but there is plenty of it (we shared meals), and you get to eat while watching a great performance by the very talented Billy Hill and the Hillbillies inside an air-conditioned building.


They are a group of musical performers that are comical and completely entertaining, and keep us laughing through our lunch.

7. Expand your Cultural Horizons.


I had heard about the Aladdin production over in the Hyperion Theater at California Adventures, but had never taken the time before to watch it. I had determined that this was one thing I wanted to experience, and told everyone early on to prepare themselves mentally for this event!


As you can see, my children were thrilled at first to be there, to say the least. However....as with most affairs and kids, they found themselves laughing throughout the play, and in the end, sheepishly admitted that they had enjoyed it. Even my littlest one had a great time.


The show was fantastic--great scenery, great acting, great music, and the Genie was hilarious. He was, of course, my kids' favorite part of the show.


The play is a speedy version of the cartoon story line that we are all familiar with, and really only lasted about 45 minutes. Totally worth it!

8. Visit the Princesses at the Fantasy Faire.


(Well--only if anyone in your family cares about princesses!) However, I wouldn't spend more than 45 minutes in line. We arrived early in the day and were told the line was a 1 1/2 to 2 hour wait. We bailed at that point! Later on (around lunch time) we returned to learn the wait was only 45 minutes (and completely accurate). The girls were desirous to wait that long, so we passed the time eating snacks and chatting with others who were waiting as well. It proved to be one of the girls' very favorite activities of the trip!


The 3 different princesses we met were personable, kind, and darling, to say the least. My girls couldn't stop talking about how much they looked and sounded like the characters in the movies, and how special the princesses made them feel. They totally felt like the 45 minute wait was worth it.

9. Stop at City Hall.


Just inside the main gates and to your left is City Hall. I didn't really know what was there, but when you visit, you can get the kiddos (or yourself) some badges to wear as free souvenirs.


They have some that say, "Happy Birthday", or "1st Visit", or "Honorary Citizen of Disneyland"...and I'm certain they come out with new ones regularly.

10. Give the Monorail a chance.


I had never ridden it before, assuming it to be a waste of my precious time in the park, but the kids expressed interest, so we gave it a try. It proved to be a relaxing and enjoyable break from the hustle and bustle of the park, and gave us a bird's eye view of many of the attractions.


I also stumbled up this fascinating article about what goes on at Disneyland after all the guests leave. Yes, some of the rumors you may have heard are true: feral cats, 300 gardeners, touch ups with gallons of new paint, and the scraping of gum---all things that occur throughout the night inside the gates of Disneyland. And my boys noticed in Disneyland California Adventures that a crew member emptied a trash can near a ride they were waiting in line for, but the bag wasn't even full yet. This article explains Walt Disney's reasoning behind things like this that occur in Disneyland before it even seems necessary. It certainly made me appreciate all that goes into creating the cleanliness and magic that Disneyland is so famous for .
What more can I say? I am in love with Disneyland and everything magical that happens there. And yep....I wanna go back!

Related Posts with Thumbnails
 
Designed By Aqua Poppy Designs for Needle in a Haystack Designs.
© Copyright. All Rights Reserved.